Sunday, 22 September 2013

Zoom in & Zoom out [Windows | MAC]

Zoom in
WebElement html = driver.findElement(By.tagName("html"));
html.sendKeys(Keys.chord(Keys.CONTROL, Keys.ADD));

Zoom out
WebElement html = driver.findElement(By.tagName("html"));
html.sendKeys(Keys.chord(Keys.CONTROL, Keys.SUBTRACT));

Zoom 100%
WebElement html = driver.findElement(By.tagName("html"));
html.sendKeys(Keys.chord(Keys.CONTROL, "0"));

Zoom Feature on MAC
WebElement html = driver.findElement(By.tagName("html"));
html.sendKeys(Keys.chord(Keys.COMMAND, Keys.ADD));
html.sendKeys(Keys.chord(Keys.COMMAND, Keys.SUBTRACT));
html.sendKeys(Keys.chord(Keys.COMMAND, Keys."0"));

Thursday, 19 September 2013

Python | Eclipse | PyDev | Selenium

Configure PyDev in Eclipse

1| Install PyDev plugin in Eclipse
Help > Install New Software...
2| Click Add and type http://pydev.org/updates
3| Select the check box, 'PyDev' and press Next.

Note:
By default, Aptana Studio has inbuilt PyDev installed; Other steps are similar to Eclipse.


4| Go to Windows > Preferences > Interpreter - Python


5| Click on 'New' and Locate python.exe  "C:\Python27\python.exe"


6| Create a New Python Project  
Right click on package Explorer > New > others
7| Type 'PyDev Project'.
8| Select 'PyDev Project' and press Finish.


9| Create a new Python package.


10| Create a new PyDev module.
Right click on package > New > PyDev module


11| Develop your python selenium script and execute Tests ;)


Wednesday, 18 September 2013

Log4j | Selenium

Configure log4j

1| Download log4j.jar  and add into build path
2| Open src folder under project
3| Create a new text file.
4| Paste the following..

#Application Logs
log4j.logger.devpinoyLogger=DEBUG, dest1
log4j.appender.dest1=org.apache.log4j.RollingFileAppender
log4j.appender.dest1.maxFileSize=5000KB
log4j.appender.dest1.maxBackupIndex=3
log4j.appender.dest1.layout=org.apache.log4j.PatternLayout
log4j.appender.dest1.layout.ConversionPattern=%d{dd/MM/yyyy HH:mm:ss} %c %m%n
log4j.appender.dest1.File=\logs\\SeleniumLogs.log
#do not append the old file. Create a new log file everytime
log4j.appender.dest1.Append=true


5| Save it with an extension, '.properties'. e.g., log4j.properties
6| Now, log through the script as shown below.

public class classname {
private static Logger Log = Logger.getLogger(classname.class);

@BeforeTest
public void setUp() throws Exception {
Log.info("_______started server_______");
Log.warn("Warn");

baseUrl = "https://yourwebsite.com";   
driver.manage().timeouts().implicitlyWait(30, TimeUnit.SECONDS);
}
   
@Test
public void testAbi() throws Exception {
driver.get(baseUrl + "/web/browse.v");
Log.info("_______Test Inprogress_______");
}
   
@AfterTest
public void tearDown() throws Exception {   
Log.info("_______Stopping server_______");

driver.quit();
}
}


6| Execute the test and check the log file, SeleniumLogs.log under logs folder.

Sunday, 15 September 2013

Store Auto-suggestions using iterator | Webdriver

Identifying auto-suggestion lists and storing them can be achieved using iterator. Couple of examples shown below demonstrate iterators and their use on auto-complete.

e.g.,
1|
driver.get(baseUrl+"http://www.indiabookstore.net/");
driver.findElement(By.id("searchBox")).sendKeys("sam");
driver.manage().timeouts().implicitlyWait(10, TimeUnit.SECONDS);
  
WebElement table = driver.findElement(By.className("acResults"));
List<WebElement> rowlist = table.findElements(By.tagName("li"));
System.out.println("Total No. of list: "+rowlist.size());
Iterator<WebElement> i = rowlist.iterator();
System.out.println("Storing Auto-suggest..........");
while(i.hasNext())
{
  WebElement element = i.next();
  System.out.println(element.getText());
}


2|
driver.get(baseUrl+"https://www.google.co.in/");
driver.findElement(By.id("gbqfq")).sendKeys("Sams"); 
driver.manage().timeouts().implicitlyWait(10, TimeUnit.SECONDS); 
   
WebElement table = driver.findElement(By.className("gssb_m"));     
List<WebElement> rows = table.findElements(By.tagName("span")); 
System.out.println("Total no. of rows: "+ rows.size());
Iterator<WebElement> i = rows.iterator();  
while(i.hasNext()) {  
  WebElement row = i.next();  
  System.out.println(row.getText());

Thread.sleep(4000);
rows.get(1).click();
Thread.sleep(5000);


Alternate Concept for iteration


List<WebElement> listitems = driver.findElements(By.id("value"));
for(WebElement temp: listitems) // temp is the declared variable name
{
System.out.println((temp.findElement(By.tagName("value")).getText()));   
}

Friday, 13 September 2013

Python | Selenium

Python set up

1| Download and install Python 2.7

pip is a package management system,  a tool for installing and managing Python packages. easy_install is similar to pip.

Configure easy_install
   2.1| Install setuptools | Windows 32-bit machine 
   2.2| If you're using Windows 64-bit machine, save this ez_setup.py file in local directory and run it.

Configure pip
   3| Save this get-pip.py file into local directory and run it.

4| Install Selenium Python Client Driver
    a| Open cmd prompt
    b| Locate the folder C:\Python27\Scripts in cmd and enter
easy_install selenium
or|
pip install selenium


5| Generate scripts from Selenium IDE.
6| Export Test case as Python 2 / unittest / WebDriver
7| Double click on .py file and execute python test.


Selenium Update for Python

1| Open cmd prompt
2| Locate the folder C:\Python27\Scripts in cmd and enter
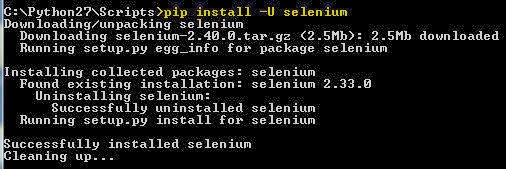
pip install -U selenium
or|
pip install selenium==2.40
or|
easy_install -U selenium
3| Setup tools can also be updated [only if needed].
pip install --upgrade setuptools


Thursday, 12 September 2013

Basic Selenium Functions for Newbies

This section is for newbies about selenium webdriver. There will be frequent updates on this.

close()
Closes current active window.
driver.close();

#PYTHON
self.driver.close()

#RUBY
@driver.close


quit()
Quits the driver and closes every windows.
driver.quit();

#PYTHON
self.driver.quit()

#RUBY
@driver.quit


getTitle()
Get the current page title.
driver.getTitle();

#PYTHON
#1 | print page title
print driver.title
#2 | assert text in the page_title
assert "your text" in driver.title
#3 | assert text in the page_title
self.assertIn("your text", driver.title) 
#4 | assert page_title
self.assertEquals("your page_title", driver.title, "Asserting Title")

#RUBY
#1 | print page title
puts @driver.title
#2 | assert page_title
assert_equal('your text', @driver.title)


getPageSource()
Retrieves all the page source.

#1 | print page_source of a web page
System.out.println(driver.getPageSource());
#2 | assert text in a web_page
driver.getPageSource().contains("your text");
#3 |
boolean b = driver.getPageSource().contains("your text");
assertTrue(b); 
#4 |
Boolean b =  driver.getPageSource().contains("your text");
System.out.println(b);

#PYTHON
#1 | print page_source of a web page
print driver.page_source
#2 | assert text in a web_page
assert "your text" in driver.page_source

#RUBY
#1 | print page_source of a web page
puts @driver.page_source
#2 | assert text in a web_page
assert(@driver.page_source.include?("your text"))


findElement()
Finds first element within the current page. 
WebElement element = driver.findElement(By.xpath("//div[@class='google-header-bar']"));


findElements()
Finds all the elements within the current page.

1| Store Length
driver.get("https://accounts.google.com/");
List<WebElement> scriptcount = driver.findElements(By.xpath("//script[@type='text/javascript']"));
System.out.println("Overall textboxes: "+scriptcount.size()); 

2| Click Element
driver.get("http://www.indiabookstore.net");
driver.findElement(By.id("searchBox")).sendKeys("Alche");
List <WebElement> listItems = driver.findElements(By.xpath("/html/body/div[4]/ul/li"));
listItems.get(0).click();

3| Track by TagName
List<WebElement> link = driver.findElement(By.id("Value")).findElements(By.tagName("li"));

Wednesday, 11 September 2013

Selenium Builder | Running selenium scripts on Cloud


Selenium Builder is similar to Selenium IDE. It has special credits like running cross-browser tests on Cloud directly from IDE. Exporting selenium scripts in Java/TestNG/Webdriver combination is feasible on Selenium Builder.

1| Create an account on Sauce and obtain the access key
2| Install the Addon, Selenium Builder in Firefox web browser
3| Open the webpage under test
4| Right click on the page > Launch Selenium Builder
5| Click Selenium 1 | Selenium 2
6| Record selenium scripts
7| Go to 'Run' menu
8| Click 'Run on Sauce OnDemand'
9| Enter the Sauce Username and Access Key
10| Choose the Browser and OS combinations for test execution.


11| Log into Sauce and verify the test results.

Handling Captcha | Webdriver

Make use of the 'input' tag with type 'hidden' in-order to handle Captcha.

Look at this example for reference..


driver.get("http://www.google.com/recaptcha/learnmore");
driver.switchTo().frame(0); //calling iframe with no id
JavascriptExecutor js = (JavascriptExecutor) driver; 
//Setting the captcha values 
js.executeScript("document.getElementsByName('recaptcha_challenge_field')[0].setAttribute('value', '03AHJ_Vuv4tV3FrmUHbImL9JPkWJNqs1KDbFdKfG1jhqa2Uhl4U1vzLxXtZMMkZoAHuVCXA1js3GiaaQJ-zqyuledzZP-PEOV-y_Fx87-U6HVu4nh8kfwPzfPU50yEV5oscb20ptwMGR5EEoAtE8dfAlwCVejJtP779upzfAqn_ID5IQJ2F9Nw218')");
driver.findElement(By.name("recaptcha_response_field")).sendKeys("23129555894");
driver.findElement(By.name("Button1")).click();


Note: setAttribute plays a major role here.

Sunday, 8 September 2013

Handling Windows using AutoIt | Selenium


Configure AutoIt with Selenium script

1| Download AutoIt Full Installation and install
2| Create a new file with extension .au3 | Open a folder Right click > AutoIt v3 Script
3| Right click the file > Edit Script
4| Remove all the scripts (if present)
5| Select Tools > AU3Recorder [record and playback]
6| Select all the 3 check box before recording
7| Press 'Click To Record'
8| After recording, try to edit/remove the function name that starts with an underscore '_' (from script). ie., _AU3RecordSetup()
9| Right click the file > Compile Script
10| An executable file .exe will be generated and ready for integration with Selenium
11| Call the Autoit script, file.exe in Selenium script as shown below,

Runtime.getRuntime().exec("C:\\Users\\Sams\\Desktop\\create.exe");

Note:- 
#1 Install SciTE, SciTE4AutoIt3.exe if the option, AU3Recorder found missing under tools menu.
#2 Sometimes issues like. "The program can't start because MSVCR100.dll is missing from your computer." may appear. Try installing,
Microsoft Visual C++ 2010 Redistributable Package (x86) (or)
Microsoft Visual C++ 2010 Redistributable Package (x64)
based on your machine support for fix.
#3 Autoitscript Functions

Wednesday, 4 September 2013

Keys in Selenium script | Webdriver

Key combinations made easier through Actions. Some of the popular keys were illustrated in this section; Similar key functions can be used for other keys from the image.

Enter/Return
driver.findElement(By.id("Value")).sendKeys(Keys.RETURN);
or|
driver.findElement(By.id("Value")).sendKeys(Keys.ENTER);

#PYTHON
from selenium.webdriver.common.keys import Keys
driver.find_element_by_name("Value").send_keys(Keys.RETURN)
or|
element = driver.find_element_by_id("Value")
element.send_keys("keysToSend")
element.submit()

#RUBY
element = @driver.find_element(:name, "Value")
element.send_keys "keysToSend"
element.submit
or|
element = @driver.find_element(:name, "Value")
element.send_keys "keysToSend"
element.send_keys:return


Down Arrow
driver.findElement(By.id("Value")).sendKeys(Keys.ARROW_DOWN);


TAB
Actions action =new Actions(driver);
action.sendKeys(Keys.TAB).sendKeys("keysToSend");
action.build().perform();

#PYTHON
driver.find_element_by_name("Value").send_keys(Keys.TAB)


Ctrl+End | Scroll to Bottom of the page
Actions actions = new Actions(driver);
actions.keyDown(Keys.CONTROL).sendKeys(Keys.END).perform();


Backspace
Actions actions = new Actions(driver);
actions.sendKeys(Keys.BACK_SPACE).perform();

#PYTHON
driver.find_element_by_name("Value").send_keys(Keys.BACKSPACE)
or|
driver.find_element_by_name("Value").send_keys(Keys.BACK_SPACE)


#PYTHON